Showing posts with label Kernels. Show all posts

[Kernel] Black Reactor for Samsung Galaxy Y

Monday, June 3, 2013
Posted by Unknown
Tag :
This is a custom kernel that is developed by Black synergy from xda-developers. He claims that it is the most stable, sleek and fastest kernel out there. Recommended for gaming too.

Features:
Governors: 
  • lulzactive
  • virtuous
  • wheatly
  • smartassv2
  • interactive
  • conservative
  • ondemand
  • userspace
  • powersave
  • bcm21553
  • lionheart
  • performance
I/O Schledulers: 
  • noop
  • deadline
  • cfq
  • vr
  • sio
Other:
  • Most efficent init.d support
  • Faster boot
  • Light weight (3.6MB)
  • Droid Wall added
  • Swap
  • No CWM included
  • EXT 2/3/4 support
  • Battery saving up to 20%
  • No zRAM
Download kernel - Click here.

Instructions:
  1. Boot into CWM Recovery
  2. Go to mounts and storage and make sure to mount /system and /data
  3. Go back and choose to install zip from sdcard
  4. Then choose zip from sdcard, then locate the kernel zip file and choose it
  5. Confirm by choosing Yes when asked
  6. After installation is complete, press the back or power button to go back to the main menu
  7. Choose reboot system now
Official xda thread:
http://forum.xda-developers.com/showthread.php?t=2306767 
 

Mitko (Author)
About The Author:

Mitko is the main author and founder behind GalaxyYArchive blog. He is a recently graduated student from Bulgaria who loves tweaking his Android phone and sharing new discoveries with his blog readers.
Mitko is on: Twitter | Facebook | Google+

Kuro Kernel for Samsung Galaxy Y

Wednesday, April 10, 2013
Posted by Unknown
Tag :
xda Developer, kurotsugi developed a kernel for Samsung Galaxy Y named Kuro Kernel. This kernel supports all ROMs includes Stock ROM.

Features:
  • Compatible to all ROMs
  • Simple,Light,Yet Customizable
  • Save more Batteries
  • Decent Performance
  • Init.d Support
  • Advanced Power Management Enabled
  • Droidwall Support
  • BaCeM Tweak
  • 4 Frequencies
  • A Few more Governor and I/O
Downloads:
  • Flash the zip file via ClockworkMod (CWM) Recovery.
Credits:
  1. Irfanbagus
  2. Savie
  3. MarcoToo
  4. Harish
  5. Maroc
  6. Kurotsugi
  7. lastly You.


Paolo (Author)
About The Author:

Paolo is another author of GalaxyYArchive Blog. He is a Filipino and loves to install modifications on his phone to share it to other Samsung Galaxy Y Users.
Paolo is on: Facebook | Google+

[Kernel] Hell's Fusion Kernel

Sunday, April 7, 2013
Posted by Unknown
Tag :

Here is a custom kernel made by hell_lock of XDA Forums.

Features:
  • Ramdisk Modded to Run CM7 Easily
  • BaCeM Tweak
  • Additional WiFi and Brightness Modules
  • ClockWorkMod (CWM) Recovery
  • 4 Frequencies (156,312,624,832Mhz)
  • 16 Governors
  • 5 I/O Schedulers
  • Droidwall Supported
  • Ext4,3,2 Supported
  • Decent Performance
  • Init.d Supported
Downloads:
Instructions:
  1. Download Hells_fusion#50.zip and CWM.zip
  2. Put it on your SD Card
  3. Turn off your Phone
  4. Go to Recovery Mode (VolUp+HomeKey+PowerKey)
  5. Now choose Apply update to SD Card
  6. Choose CWM.zip
  7. Now go to Install Zip from SD Card
  8. Now go to Choose Zip from SD Card
  9. Choose the hells_fusion#50.zip
  10. After that follow the Instructions given on Aroma Installer.
  11. After the Aroma Installer, Finally Reboot System Now
  12. Install No-frills CPU Control and CPU Spy
  13. Go to No-frills CPU Control:
  • Governor = smartassv2
  • I/O Scheduler = noop
  • Max. Frequency = 832mhz
  • Min. Frequency = 156mhz
  • Finish!

Credits:
  • Savie
  • Irfanbagus
  • Maroc-OS
  • dsixda
  • Sakindia
  • kurotsugi
  • MarcoToo
  • whitexp
  • Rio
  • hell_lock

Paolo (Author)
About The Author:

Paolo is another author of GalaxyYArchive Blog. He is a Filipino and loves to install modifications on his phone to share it to other Samsung Galaxy Y Users.
Paolo is on: Facebook | Google+
A custom kernel being developed by percy_g2 from xda-developers.

Features:
  • CWM recovery
  • Fixed source codes in update 3
  • More stable and smooth
  • Battery saving
  • New schedulers added
  • init.d support fixed
  • New freqs added (156-312-468-624-832) scaling
  • Powersave,Lionheart,smartassv2 and conservative gov added
  • EXT4 support added ( tested)
  • CM 7 support (tested)
  • Used GT-S5360_GB_Opensource_Update3 as a source to build it
Download .tar for Odin - Click here.
Download .zip for CWM - Click here.

Instructions:
Odin:
  1. Boot into Download mode
  2. Start Odin on PC and connect your Galaxy Y, it should detect it
  3. Put the .tar file in the PDA field and click start
CWM:
  1. Boot into Recovery mode and flash CWM Recovery
  2. Go to mounts and storage and mount everything (don't worry if you get a sd-ext mount error)
  3. Go back, choose to install zip from sdcard
  4. Locate the kernel zip file and choose it, choose Yes when asked
  5. After installation is complete, go back and choose "reboot system now"
Source:
http://forum.xda-developers.com/showthread.php?t=2176015
    Mitko (Author)
    About The Author:

    Mitko is the main author and founder behind GalaxyYArchive blog. He is a senior highschool student who loves tweaking his Android phone and sharing new discoveries with his blog readers.
    Mitko is on: Twitter | Facebook | Google+

    [TOOL] Kernel Flasher from Recovery Mode v2.0

    Thursday, February 28, 2013
    Posted by Unknown
    Tag :
    Presenting you the Kernel Flasher tool by faqbly from xda developers. This tool helps you flash kernels in a simple way without increasing your custom bin count.
    The procedure is pretty simple, you choose a kernel which you want to use, you put the boot.img file in the root directory of your SD card, flash the tool which is a zip file in CWM recovery and you're done.
    Along with that it creates a backup of your previous kernel image file which should be named OLDboot.img and it should be located on the root directory of your SD card.

    In most cases now kernel developers make flashable zip files of their kernels, if you happen to encounter only a boot.img file of the kernel released, you may use this tool to flash it quickly.

    If for some reason you want to flash a kernel using this tool which's boot.img file is located in a zip file, simply extract it using an archive program such as WinRAR or 7zip.

    Download: Click here. 

    WARNING:
    This tool could brick your phone. Neither the developer nor GalaxyYArchive will be responsible for the consequences caused by using this tool.
    Do this at your own risk!

    Instructions:
    1. Download the tool and put it on your SD card
    2. Download CWM recovery if you don't have it and also put it on your SD card
    3. Download your desired kernel's boot.img file to root directory on your SD card (aka not in any folder)
    4. Boot into recovery mode, then flash the CWM recovery
    5. Once in CWM recovery just incase, make sure to go to mounts and storage and mount everything you can, mount /system should be your #1 priority 
    6. Go back, flash the tool zip file and reboot
    7. Enjoy the kernel
    Stuck on Samsung Logo? Recovery does not work aswell?
    Either flash only a stock kernel using Odin or just directly flash a stock rom using Odin to go back to normal.

    Source: http://forum.xda-developers.com/showthread.php?t=1552889


    Mitko (Author)
    About The Author:

    Mitko is the main author and founder behind GalaxyYArchive blog. He is a senior highschool student who loves tweaking his Android phone and sharing new discoveries with his blog readers.
    Mitko is on: Twitter | Facebook | Google+


    Features:
    • 100 + patches on kernel linux 
    • Tweaks and patches for system rfs ,ext 2,ext3, ext4
    • Modified memory allocation on kernel linux 
    • Battery drain reduced with +20 tweaks ...
    • And many more 
    Requirement:
    A rooted Samsung galaxy y and a computer running on windows with required drivers can get it here.

    Samsung Driver:


    Kernel File

    Odin:

    Wifi Driver:


    Installation Instructions
    • First of all i hope you have installed required driver on pc and downloaded the rooting kit.
    • Next extract the ODIN using any file extracting application like winzip or winrar on pc.
    • Now you have to power off your smartphone so that you can enter in download mode.
    • Now to boot your phone in Downloading mode press Volume Down + Home + Power button together until you see the warning screen on your device. 
    • A warning will appear on your device. Now Press Volume Up to continue to the downloading mode. You should see a screen with "Downloading...." written on it. 
    • Now connect your phone to PC via USB cable. 
    • As we have already extracted the odin on pc so open Odin.exe from there. 
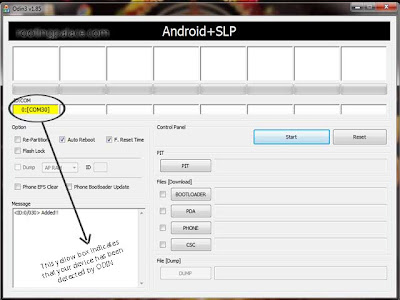
    • ODIN should detect your device on any of the COM ports and if successfully detected it will be highlighted by yellow box if not install the driver again. As shown in the pic below.
    ODIN
    • Now click on PDA button under the Files (Download) section in ODIN and navigate to the folder where you have downloaded Kernel File and select "white.1.3.3.tar" file and click on open. 
    • OK now click on start in ODIN and let the ODIN complete the flashing process. Don't interrupt the process the green box in Odin window shows "Pass", and now your phone will be reboot.
    • Now the White Kernel has installed in your SGY
    • Next We must Change the Wifi Driver to fix the Wifi from Connecting:
    Wifi Driver:

    CWM: 


    • Just Flash the Wifi Driver via CWM and Reboot, Now the Wifi is Fix

    Developer: whitexp

    Installing Merruk Kernel2.5 on JBV 3.0.3 (1.2GHz)

    Friday, November 23, 2012
    Posted by Unknown


    Things you need to download are listed follow:
    Odin with USB driver
    PDA.merruk.tar
    1 Elite.module.zip
    Ext4 Converter.zip

    Root galaxy y.zip(edited)
    Put the 1 Elite module.zip,Ext4 converter.zip and root galaxy y.zip in your Sdcard(not in any Folder)

    NOTE: Following the procedure carefully cannot brick your phone. Dont' skip any step

    Lets begin:
    1.Flash fresh stock rom via Odin.
    2.When flashing the stock rom is complete, go to Settings > Application > Enable Unknown sources.
    3.Wait until media scanning is complete.When the media scanning complete,reboot to recovery.
    4.Go to CWM(Clockworkmod) and flash root galaxy y.zip and reboot back to recovery in advanced > reboot recovery.
    5.Now install JellyBlastv3 ROM.
    6.Install the JBv3 rom in CWM including its OTA update to JB3OTA3 not 4 (by rebooting to recovery back and install the update one by one)
    7.When the installation is complete wait until your phone boots.
    8.When it boots, go to Settings > Application > Check Unknown Sources and go to Development > check USB debbuging
    9.Don't install any application because if you install any application, the backup and restore time will be long.
    10.Now, boot phone to recovery mode and flash root galaxy y.zip again because JBV3 superuser doesn't work on phone.
    11.Reboot phone to download mode.
    12.Connect phone to PC with USB
    13.In your PC,open Odin and press PDA and insert PDA.merruk.tar and don't check the box "reboot phone"
    14.And press Start. When it passes, reboot your phone to recovery by holding Power button + Home button + Volume up at the same time.
    15.When you get to recovery mode, go to backup and restore > and Backup. Wait until Backup complete.
    16.When the backup is complete go to install zip from sdcard > choose zip from sdcard > and flash 1 Elite module.zip
    17.And don't reboot your phone, go to install zip from sdcard > choose zip from sdcard > and flash Ext4 converter.zip
    18.Now it is time to restore, for this go to backup and restore > advanced restore > Restore system
    19.Now it will show error like "error while unmount system" Don't worry.
    20.Go back and go to advanced > report error
    21.Wipe data and then wipe cache and reboot recovery in advanced > reboot recovery;
    21.When you get to recovery mode back Flash 1 Elite module.zip again.
    22.Now go to backup and restore > advanced restore > restore system, data and cache don't need to restore boot.img
    23.When the restore is complete, reboot phone.
    24.Boot animation doesn't work but you can hear boot sound
    25.When the phone booted successfully, go to Settings > About phone, and see the kernel info(Enjoy).

    Setting up cpu:
    • Max freq=1.248GHz
    • Min freq=634MHz
    • Governor=conservative or smartassV2
    • I/O schedular=sio
    Note :::After installation,you can update to OTA 4!
      Thanks to Maroc-OS 
      I cannot make the video because i do not have a camera :D
      Tell Mitko to make the video if he can do this : D

      [KERNEL] savieSGY "savie@buitenzorg"

      Wednesday, November 7, 2012
      Posted by Unknown
      Tag :
      So here is another kernel for the Galaxy Y. Developed by savie from xda-developers.

      - Main Features:
      • 5 freq (156-312-468-624-832)
      • dualboot support
      • CM7/9 support
      • cwm recovery 5.x.x
      • system-replacer support
      • init.d support
      • swap support
      • ext2/ext3/ext4 support
      • sio-iosched
      • smartassV2 governor
      • sdcard and battery tweak
      • - Additional Features:
      • 3 iosched
      • 18 governor
      • bacem tweak (-80mV)
      • cifs modules
      • activate 2ndROM
      • droidwall modules
      Download: Click here.
      CWM.zip for flashing - Click here.

      Installation video:


      No need to wipe any data or cache after flashing. Just be sure to install Nofrill's CPU Control to enjoy the kernel at it's best, and CPU Spy to monitor your frequencies.

      MT Kernel Developer Edition 4 ( v.2.5 )

      Tuesday, September 25, 2012
      Posted by Unknown
      Tag :

      Hello Guys  Uploading The New Kernel 

      This One are relly Good  you need to test all things and see if the performance are increased 
      Notice : Superuser.apk removed  so if you wana root the device just put you new files in :

      /system/rooting

      we support : su, busybox and Superuser.apk in that folder

      For ext4 this one are really do the job 

      To convert you STL blocks you need to do this :

      1) - Make a Nandroid Backup.
      2) - Install the attached EXT4 Zip file.
      3) - Restore your Nandroid Backup.
      4) - Flash the PDA.merruk.tar (cause the nandroid backup will flash back your old kernel) 
      5) - Enjoy The New Speed 


      This File do 2 things for ext4 , & reset the custom bin counter (Bin file used from docky Thanks for him), and finally Flash the kernel.
      Convert the blocks to ext4 filesystem, and tune the filesystems with ext4 specs 
      You can easely turn you system to ext3/2 to have more speed (ext2 is better cause no journal there so it turns fast recording to the checks found in internet)

      For Kernel if you used the EXT4 Zip File you are done, if not flash the PDA file attached via Odin.

      After Installing please let the system take the time nedded to full booting and reboot twice to take effects 

      Have a Good Day 

      Please Your Reports improve the kernel, so send them 

      EDIT:

      guys please read carfully it's not for noobs.

      if you wanna convert your blocks the partitions system/data/cache will be formated and converted to ext4, the zip attached also flash the kernel.

      if you don't wanna be in ext4 FS just flash the attached kernel as pda (PDA.merruk.tar).


      This Kernel is Developed by: Maroc-OS (XDA)

      Download:
      File Type: tarPDA.merruk.tar - [Click for QR Code] 
      File Type: zipExt4_Converter.zip - [Click for QR Code] 

      MerrukTechnology Kernel 2.0 (with video installation guide)

      Tuesday, August 21, 2012
      Posted by Unknown
      Tag :
      Features:
      • Swap Support.
      • Some Bug Fixes.
      • CPU Spy App Fix.
      • Game-Port Modules.
      • Graphic Engine Driver.
      • Security Patches Added.
      • TUN/TAP, Virtual Adapter.
      • Added USB CORE Support.
      • HID, EHCI, OHCI, Support.
      • VibeTunz (TM) Technology.
      • MERRUK Tempfs for SU Binary.
      • EXT2/EXT3 & EXT4/JBD2 support.
      • SD-EXT Support, System & Recovery.
      • CIFS Support. (Mount Shared Folders).
      • NETFILTER Compatibility with DROIDWAL.
      • Recouvery in Read/Write mode & [ADB Root].
      • Added IO Scheduler. (Deadline, CFQ, VR, SIO).
      • BLMUNLOCK Added, & a Script to run it at boot.
      • INIT.D Support & Auto Create init.d in /system/etc.
      • BusyBox Support PreInstalled (Busybox binary in /sbin).
      • Root Support [ADB Root] & PreInstalled (SU binary in /sbin).
      • Added MFC, (MULTI FORMAT CODEC) Firmware From Samsung.
      • Multi-language Module Support For UTF-8 on CIFS Mount Shares.
      • /Cache and /Data, Can be mounted as EXT4. (/System Need's Fixes).
      • Add The Permanent Modded / Fixed CloclWorkMode Recovery. (V.5.8.0.2). 
      • Mount SDCARD WITH EXT4 FS Supported (You Need to Format it With EXT4). 
      • New J4FS SUPPORT. (We Can Mode it to have our new optimized j4fs rw filesystem).
      • Modules for VPN/IPSec Support. (IPsec AH, IPsec user configuration interface, IP Tunneling) 
      • Added CPU Governor Feature. (SmartassV2, Conservative, Ondemand, Powersave & Userspace, etc...) (Not All of them for now)
        ------------------------
      • DEBUG SCRIPTS ADDED FOR SYSTEM & RECOVERY.
      • FIXES SCRIPTS ADDED FOR SYSTEM & RECOVERY.
      • IMPORTANT MODULES LOAD'S NOW AT BOOT.
      • Plus A Lot of Other Improvements & Fixes.
       Downloads:
      Odin 1.85 - Click here.
      Samsung Kies (optional if you don't have the Samsung drivers) - Click here.
      MerrukTechnology Kernel 2.0 - Click here.
      System 1.0.8.zip - Click here.  
      Ext4.zip - Click here. 

      Installation video:


      Welcome to My Blog

      Popular Post

      Powered by Blogger.

      - Copyright © Free download game app rom samsung galaxy | Galaxy tips and trick - Powered by Blogger - Designed by Johanes Djogan -