Archive for February 2013

In this post I am going to show you how to make the menu and back buttons of your Samsung Galaxy Young vibrate upon touch.
Why do I need this, you ask? Everyone has a different taste for stuff and it may have come to some people's mind to want to have them vibrate upon touch.
There is no setting for this in any options menu, so we will have to do this manually by using a root browsing tool and modifying 4 lines of text on a file located deep in your system folders.
Requirements:
- A rooted phone - How to root it? Click here.
- A root browsing tool - e.g. Root Explorer
Step 1 - Finding the file for editing:
Now we are going to start up our root browsing app and go to the directory:
/system/usr/keylayout/
In there, we should see a file qwerty.kl:
 |
| 1. Be sure to mount R/W 2. The file we are going to edit |
Step 2 - Modifying the file:
Before everything, tap on the Mount R/W button at the top right corner so that we will be able to edit the files.
Now long press on the qwerty.kl file, you should get a popup with many options, so scroll down until you see the option "Open in Text Editor".

You should then see the following contents:

Now we need to modify 4 lines of text which are the following:
- KEY 158 BACK WAKE_DROPPED
- KEY 229 MENU WAKE_DROPPED
- KEY 139 MENU WAKE_DROPPED
- KEY 59 MENU WAKE_DROPPED
Final result:

Now press the menu button to get options to popup from the bottom and choose Save Changes.
And that's it, you are done. Now you just need to reboot your phone and enjoy the changes once it's back on.
To revert back, simply change the button names showed above back to WAKE_DROPPED.
 Mitko (Author)
 Presenting you Remix v1, a custom rom developed by sohan rawat from xda-developers.
Features:
Download: Click here.
Instructions:
Deathviper
evanlocked
lidroid
b16h22
hell_lock
Ne.xt
percy215
CarlDeanCatabay
san122
Official xda thread:
http://forum.xda-developers.com/showthread.php?t=2170055
Features:
- Fully Deodexed , Zipaligned.
- Removed some bloatwares.
- ICS like apps.
- ICS style Msg pop-up
- Latest Google play store.
- All google apps already updated .
- Smooth scrolling through disabled scrolling cache.
- Velocity Tweaks! + more int.d added.
- Improved swipe to remove notifications
- 6 lockscreens
- Statusbar tweaks + 15 toggles (EDT)
- Features come from the kernel like governers and frequecy init.d.
- Bravia Engine integrated
- Fast and stable
- Nexus Texan boot animation + s3 sound
Media:
 |
| CM7 icons |
 |
| CM7 Music + DSP Manager + Beats Manager |
 |
| Uses Hells Fusion #40 kernel |
 |
| Holo Locker + 6 Lockscreens |
 |
| ICS-like popup messages |
 |
| ICS themed apps |
 |
| Light and fast Zeam Launcher |
 |
| Modified Touchwiz Launcher |
 |
| Google Play Store |
 |
| Modded Settings menu |
 |
| New and transparent Statusbar & System UI + Touchwiz 5 (s3-like) toggle icons |
 |
| Themed Black & White |
Instructions:
- Boot into recovery mode, then flash CWM recovery
- Wipe data and cache
- Go to mounts and storage and be sure to mount /system
- Go back, choose to install zip from sdcard
- Find and choose the Remix_V1.zip on your sdcard
- Select yes
- Wait for the installation to be complete
- After installation is complete, choose to reboot
- Enjoy
Deathviper
evanlocked
lidroid
b16h22
hell_lock
Ne.xt
percy215
CarlDeanCatabay
san122
Official xda thread:
http://forum.xda-developers.com/showthread.php?t=2170055

The procedure is pretty simple, you choose a kernel which you want to use, you put the boot.img file in the root directory of your SD card, flash the tool which is a zip file in CWM recovery and you're done.
Along with that it creates a backup of your previous kernel image file which should be named OLDboot.img and it should be located on the root directory of your SD card.
In most cases now kernel developers make flashable zip files of their kernels, if you happen to encounter only a boot.img file of the kernel released, you may use this tool to flash it quickly.
If for some reason you want to flash a kernel using this tool which's boot.img file is located in a zip file, simply extract it using an archive program such as WinRAR or 7zip.
Download: Click here.
WARNING:
This tool could brick your phone. Neither the developer nor GalaxyYArchive will be responsible for the consequences caused by using this tool.
Do this at your own risk!
Instructions:
- Download the tool and put it on your SD card
- Download CWM recovery if you don't have it and also put it on your SD card
- Download your desired kernel's boot.img file to root directory on your SD card (aka not in any folder)
- Boot into recovery mode, then flash the CWM recovery
- Once in CWM recovery just incase, make sure to go to mounts and storage and mount everything you can, mount /system should be your #1 priority
- Go back, flash the tool zip file and reboot
- Enjoy the kernel
Either flash only a stock kernel using Odin or just directly flash a stock rom using Odin to go back to normal.
Source: http://forum.xda-developers.com/showthread.php?t=1552889
I've taken some time to try this out on the Galaxy Y and it's not that bad. What is cool about this is that you can download and install Addons to it, save whole websites as PDF files as well as installing Apps.
I could not test the webpage loading speed though because I'm using a mobile data plan for an internet connection which is bad compared to a wireless network. If you are going to try this then please, leave a comment on how the web page loading performance is like on a faster internet connection.
Video:
The APK size of this is approximately 24MB and you can download it from their official website: http://nightly.mozilla.org/
Direct download link:
http://ftp.mozilla.org/pub/mozilla.org/mobile/nightly/latest-mozilla-central-android-armv6/fennec-22.0a1.multi.android-arm-armv6.apk

Here is a flashable zip file with tons of tweaks and other script merged into one. This was done by kaustubh.rockstar from xda-developers forums and released for our Galaxy Young. He claims that it should work on all GB ROMs, ICS ROMs, and JB ROMs with init.d support ofcourse.
But we all know we will always be with a GB ROM so the only reason I mentioned that is because people with different devices may be browsing the blog.
Features:
- Cleaned up
- MUCH better Ram usage
- Cache Cleared at every boot
- SD speed tweak
- Logger removed
- Better browser performance
- Sysctl tweaks
- Added modified Zram script
- Better battery life
- Lag? GONE
- Faster GUI
- Loopy smoothness tweak
- Apps zipaligned at every boot
- Faster Networking
- Smoother LWP animation
- Adrenaline boost
- Kernel Tweaks
- Better gaming
Disclaimer:
Doing the below procedure could lead to damaging your phone (soft-brick).
GalaxyYArchive will not be responsible for any unrecoverable damages, loss of data and other possible consequences, do this at your own risk!
- Boot into CWM Recovery
- Go to advanced, choose wipe dalvik cache
- Go back, choose to install zip from sdcard
- Find the zip and install it
- Reboot
- Reboot your phone
- Flash the zip file again
- Reboot
- Wait for media scanning to be complete
- Reboot again
- Enjoy

2 mods made by Faris Hadzir from xda-developers forums. Please note that these may only work on Hyperion ROM, or atleast that's what the original poster tells us in the thread.
The modded music may actually work on any, can't say the same for the lockscreen though.
Test on other roms at your own risk!
Contents:
- HD Music Photo (Apollo)
- XPERIA S LockScreen ( Only for HYPERIA a.k.a HYPERION )


Download: Click here.
Instructions:
- Boot into Recovery Mode
- Flash a CWM Recovery
- Go to mounts and storage, choose mount /system
- Go back, choose to install zip from sdcard
- Find the HYPERIA zip file and choose it
- After zip installation is done, do not reboot
- Go to advanced, then choose Fix Permissions
- Now you can reboot
I've quickly ripped these 28 default wallpapers from the CyanogenMod7.
These can be found while using CyanogenMod7 and going to Wallpapers -> Default wallpapers.
They are in resolution of 480x320 which is the perfect size for our Galaxy Young's screen because the wallpaper will be visible in multiple pages on your launcher.


Download the pack: Click here.
Enjoy!
These can be found while using CyanogenMod7 and going to Wallpapers -> Default wallpapers.
They are in resolution of 480x320 which is the perfect size for our Galaxy Young's screen because the wallpaper will be visible in multiple pages on your launcher.
Here are a few samples:


Download the pack: Click here.
Enjoy!

Presenting you the awesome CM10 boot animation posted by KnightlyNinja from xda-developers.
This was released for the Galaxy Y's resolution (240x320).
This is not for CM10 only, but for any ROM as long as you have a custom boot animation enabled. Most custom roms support custom boot animations. If you are on a stock rom, then read this post. Follow part 1 from the instructions there only.
After doing the above procedure, you are ready to add this boot animation to your Galaxy Young.
You have 2 choices to download. Meaning you can either add this manually or you can try flashing the zip file (2nd download) in recovery mode.
1. bootanimation.zip - Click here to download.
This bootanimation.zip you will have to add manually using a root browsing tool.
OR
2. Flashable zip - Click here to download.
This zip file you can flash in recovery mode in just a few seconds.
Instructions (manual method):
- Download the bootanimation.zip to your sdcard
- With a root exploring tool, go to the sdcard, copy the zip file
- Go to /system/media/ - Mount it in R/W mode if you haven't so that you can paste the file
- Once in R/W mode, paste the zip file and choose yes if asked to replace
- Change the bootanimation.zip file permissions to r-w-r-r
- Reboot your phone and enjoy the new animation
- Download the flashable zip (not the bootanimation.zip but the other) to your sdcard
- Boot into recovery mode
- Mount /system just incase
- Flash the zip file
- Reboot and enjoy the new animation

Source: http://forum.xda-developers.com/showthread.php?t=2083843

You cannot get a hold of this free game from the Play Store as it is not compatible.
I found this ported ARMv6 APK on the web, tested it and it works on the Galaxy Young.
Description:
Take on the role of one of the mighty Greek heroes and defend your temple against hordes of mythological creatures using a vast array of powerful weapons and godly powers!
Take on the role of one of the mighty Greek heroes and defend your temple against hordes of mythological creatures using a vast array of powerful weapons and godly powers!
Clash of the Olympians highlights:
* Action packed defend the temple game that will test your wits and precision!
* 3 Heroes to choose from: Play as the mighty Heracles, the quick Perseus or the legendary Achilles!
* Face mythological creatures with different abilities! Minotaurs, Gorgons, Harpies and more!
* Train your hero! Upgrade his weapons and grant him special powers! Each hero has his own arsenal so choose wisely!
* Arcade style rewards! Show off your skill by performing head shots, multi-kills, quick kills and more!
So what are you waiting for! The hordes of Hades are approaching and only you can stop them!
Bring'em ON!
Bring'em ON!
Screenshots:


Download APK: Click here.
Password for download link: galaxyyarchive.info
Play Store link: Click here.
Play Store link: Click here.
Developer: Ironhide Game Studio
Gameplay video on the Galaxy Y:

A few weeks ago on our Facebook page I mentioned something about there being CM7 egl libs posted by a person named yusepz which were claiming to be able to play games such as GTA III and others which till now we weren't able to.
If you remember, to play GTA III you would need to have been with a Galaxy Y Duos ROM, and to be able to play Temple Run: Brave was just impossible.Thanks to these lib files and instructions below you will be able to start up the 2 games and possibly many more!
Now I'm not gonna go into details on how to obtain the 2 games, find the ways yourselves whether it's the legal or illegal ways, shouldn't be my problem but I would highly recommend you support the developers and purchase your games. But at the moment DO NOT purchase Temple Run: Brave because swiping doesn't work. Now you get past the logo/loading screen but you cannot use the touchscreen to control the character. More information on that you will see in the video below along with instructions on how to setup everything.
This does not mean that any HD game out there will be able to be played, but games which had startup problems or any other graphical glitches may be possible to be started now and maybe played.
Requirements:
- Chainfire 3D + Plugins - http://www.youtube.com/watch?v=Cmf3eMoXeno (You might need the Pro version for the EGL option)
- Root browsing tool - e.g. Root Explorer: https://play.google.com/store/apps/details?id=com.speedsoftware.rootexplorer
- Archive program that's able to extract zip files (do it either on your computer or through your phone)
- Chainfire 3D - Free Version | Pro Version
- Libs - Click here (Extract the zip file, do not flash)
Many thanks to Imranabbas22 from xda-developers for being kind enough to show these perfect instructions.
Like I said in the video, if you test more games with these lib files and manage to get them working, please leave a comment for the rest of the viewers to know.
Grand Theft Auto 3 Gameplay on Galaxy Y:

So download the IMGs.zip file again and just follow the same instructions on modifying your system apk's, building a flashable zip file and flashing it as shown in the video there.
Download IMGs-ICS.zip - Click here to download. (DO NOT FLASH THIS ZIP IN RECOVERY!)
Instructions for newbies can be found in the video of this post:
http://www.galaxyyarchive.info/2013/02/manually-adding-aosp-statusbar-icons.html
Enjoy! :)
P.S. I do not take credits for the images, I just found them on my HDD laying around from a few months ago, no idea from where I took them.

An update has been released by the Nemesis Development team for the Nemesis One HD (v1.1) ROM. This means you should only flash this to that particular version and not the old one to stay away from problems.
The following changes have been made:
- New Statusbar with brightness slider
- EDT Fixes
- Framework fixes
- New forum app for instant support and discussions
Instructions:
- Boot into recovery mode
- Flash the CWM recovery by madteam (you should still have it if you flashed this rom)
- Once there, go to mounts and storage and just incase mount everything you can
- Go back, choose to install zip from sdcard
- Locate the OTA1 zip file and choose Yes when asked
- Once installation is complete, press the Power button to go back to the main menu of CWM
- Choose reboot system now
In this video, I am going to show you how to manually add them to your Galaxy Young the safe way (as long as you do everything properly ofcourse).
With this method not only can you put these icons but you can also leech statusbar icons off other ROMs by taking the necessary png's from their drawable-ldpi folders and inserting them in your system apk's, then creating a flawless flashable zip with UOT Kitchen.
What will we be using for this procedure?
- 7zip, WinRAR or any other archive program
- UOT Kitchen
- Stock Recovery
- I would recommend to use 7zip for this one - Click here.
- Link to IMGs.zip (DO NOT FLASH THIS, EXTRACT IN PC!) - Click here.
- Link to UOT Kicthen - Click here.
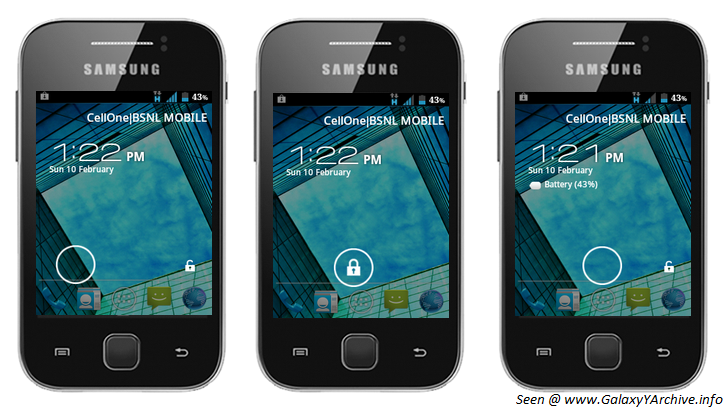
Here is a cool mod for the people who use stock roms. You get to have the ICS Lockscreen on your phone. This was posted and made by Ganesh A from xda-developers.
The procedure is simple, you download a flashable zip file depending on your rom and flash it via CWM.

Below are official download links to 4 custom roms that have been tested and working:
Also please note that stock roms are not supported because you would need to modify additional files in order to "enable" in a way to use custom lockscreens.
Installation instructions:
http://forum.xda-developers.com/showthread.php?t=2141631
The procedure is simple, you download a flashable zip file depending on your rom and flash it via CWM.
Screenshot:
Below are official download links to 4 custom roms that have been tested and working:
- Hyperion - Click here.
- JellyBlast - Click here.
- Cod Rom - Click here.
- USSR - Click here.
Also please note that stock roms are not supported because you would need to modify additional files in order to "enable" in a way to use custom lockscreens.
Installation instructions:
- Download the zip file depending on your ROM and put it on your sdcard
- Boot into recovery and then flash CWM recovery.
If you don't have it - Click here to download CWM - Go to mounts and storage - be sure to mount /system
- Go back, choose to install zip from sdcard
- Locate the zip file on your sdcard, choose Yes
- Reboot
- Enjoy
http://forum.xda-developers.com/showthread.php?t=2141631
Here it is, the long awaited Nemesis ROM for the Samsung Galaxy Young which a lot of people were waiting for. You won't find this released at xda-developers this time but only in their official page and fan sites.
Now enough talk, let's take a look at what we have here.
Below are official images by devs:


I can't post all of the content here because it would make the post very big so to see alot more screenshots and features explained, please visit:
http://www.nemesisdevs.tk/?page_id=13
Downloads:
Nemesis One v1:

Nemesis One v1.1 (HD):
Instructions:
Please note that I do installation without the Nemesis Kernel. Sorry if I was confusing, I had a bad day.
Now enough talk, let's take a look at what we have here.
Below are official images by devs:


I can't post all of the content here because it would make the post very big so to see alot more screenshots and features explained, please visit:
http://www.nemesisdevs.tk/?page_id=13
Downloads:
Nemesis One v1:
Nemesis One v1.1 (HD):
- Removed bloatware. ( almost 20 mb removed )
- New HD Screen Drivers.
- WiFi error fixed. No need to flash drivers anymore.
- Seeder included to increase entropy.
- Claimed to be even more fast!
Disclaimer:
Doing the below procedure could lead to damaging your phone (soft-brick).
GalaxyYArchive will not be responsible for any unrecoverable damages, loss of data and other possible consequences, do this at your own risk!
- Boot into recovery mode then flash CWM recovery - Click here to download CWM
- Wipe cache and data
- Once in recovery mode, go to mounts and storage, and mount everything possible (sd-ext may give an error but ignore it)
- Then finally go back, then go to install zip from sdcard -> choose zip from sdcard - Choose the nemesis zip file which you choose to download
- Select yes when asked
- Follow the AROMA installer, it should be as easy as installing software on your computer
- Choose to install stock kernel.
- After installation of it is complete, go back to CWM (first make sure that everything is mounted again) and then again, flash the nemesis zip file to get back to the installer
- Now choose to install the Nemesis kernel.
- After installing the kernel, you are back in CWM recovery, then go to mounts and storage and again be sure to mount everything, then flash the zip file for wifi drivers fix - Click here to download.
- After installation is complete, again make sure everything is mounted, flash the nemesis installer zip and then finally choose to install the nemesis rom (you may enable the reboot option once installer is finished)
- After it is installed, your phone will reboot
- Enjoy the rom and please post some feedback in the comments for the rest to see
UPDATE:
A video has been made:
Please note that I do installation without the Nemesis Kernel. Sorry if I was confusing, I had a bad day.


.jpg)